
How to choose board caliper
Caliper T affects dimension conversion, folding and selected fitting features. Strength also depends on material, grain, structure and processing. Confirm material selection with the intended contents and a physical sample.
Folding cartons: 0.3–1.2 mm
Small card boxes use 0.35–0.8 mm; gift and cosmetics boxes go to 1.0–1.2 mm. Too thick folds badly on a small box.
Corrugated and thick board: 1.5–5 mm
Illustrative corrugated calipers: E flute about 1–1.8 mm, B about 2.5–3.5 mm, C about 3.5–4.5 mm. These are not supplier tolerance standards. Double-wall board may exceed the tool’s 5 mm limit; do not substitute 5 mm for a thicker measured board.
What caliper changes
Caliper affects clear space, outer size, wall stacks and some tongue and lock dimensions. T does not determine every scoring parameter: the tool does not calculate machine score depth or board springback. Sample again after changing board.
Construction diagram
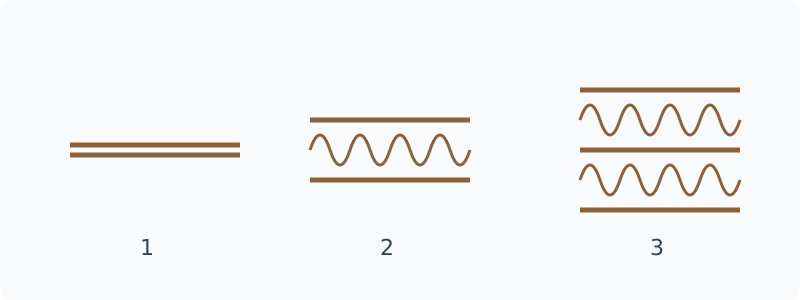
Download diagram SVG (not a production dieline)
Measure caliper and choose a style
Ask the supplier for measured caliper and measurement conditions, then check several uncreased positions with an appropriate thickness gauge without crushing the flute. Grammage cannot directly convert to mm. The table is a starting point; grain, moisture, coatings and equipment still need sample validation.
| Board / construction | Illustrative caliper (mm) | Tools to evaluate |
|---|---|---|
| Solid folding board | 0.3–0.8 | Tuck-end carton · Game tuck carton |
| Single-wall E flute | 1–1.8 | Mailer (one-piece) |
| Single-wall B / C flute | 2.5–4.5 | RSC corrugated carton |
Worked examples and tool checks
L × W × H = 60 × 90 × 150 mm; T = 0.5 mm. Die face: 61 × 91 × 150 mm. Outer: 61 × 91 × 151 mm.
Practical decisions and common mistakes
Gauge pressure, measuring position and crushed flutes can change the reading. Measure several locations away from creases, glue and seams, and record the material, batch and measurement conditions. If only gsm is available, do not apply a fixed conversion to millimetres. Ask for a sample or a supplier specification before rebuilding a dieline around an assumed thickness.
Checks before handing off a file
After changing material, check more than whether the product fits. Observe tuck friction, corner cracking, springback and surface scuffing after folding. Grain, humidity and processing conditions also matter, and a thicker material is not automatically better in every direction. Geometry tools support comparisons; final material selection also depends on the intended equipment, use and physical trials.
Export and sample checks
Open exported SVG, PDF or DXF in millimetres at 100% scale. Measure a known panel and inspect CUT/CREASE/BLEED separately. Cut an unprinted sample and check the product, inserts, tongues and lid before converter review. Diagrams explain the model; they do not include machine kerf, springback or supplier compensation.
Frequently asked questions
- How many millimetres is 300 gsm?
- There is no universal conversion. Fibre, density, coatings and structure affect thickness; use supplier data or measure the actual material.
- Is thicker paper always better?
- No. It may make folding harder, reduce inner space or change tuck fit. Choose material together with contents, structure and production method.
- What if caliper exceeds a tool’s range?
- Do not replace the actual thickness with the maximum setting. That distorts conversion. Use a suitable model or discuss the structure with the maker.
- How do I check printed scale?
- Choose Actual size or 100%, disable Fit to page and measure a known edge. If the layout exceeds the printable area, use suitable paper or tiled printing.
- Do I need a blank sample before production?
- Use the intended material to check dimensions, folds, clearance and actual contents, then confirm processing with the maker. A screen preview cannot replace a physical test.